

![]()
|
|
Introduction |
A paragraph is a range of text followed by a paragraph return. The appearance of a paragraph is dependent on its paragraph attributes. The most common paragraph attributes are indents, tabs, alignment and leading.
PageStream does not force you to apply paragraph attributes to paragraphs only; you can apply different paragraph attributes to ranges of characters within a paragraph.
Some paragraph attributes take effect only when applied to the first character in a paragraph. To avoid confusion, apply paragraph attributes to entire paragraphs. (Triple click in a paragraph to select it.)
![]()
To change paragraph attributes for selected paragraphs: Select
the paragraphs to change with the Text tool. Choose the appropriate
Type menu command or select its equivalent from the Paragraph
view of the Edit palette.
If you want to apply paragraph attributes to separate paragraphs, you should consider using paragraph styles to save time.
To change the attributes for all text formatted with a paragraph style: Hold down Shift while choosing a style from the Paragraph Styles submenu in the Type menu to display the Paragraph Style dialog box. Modify the attributes and click OK. All text formatted with that style will change automatically.
PageStream allows you to indent text to the next available tab stop by pressing the Tab key. You can set the position and alignment for each tab stop you create. PageStream can align text on its decimal place, comma or any other printing character.
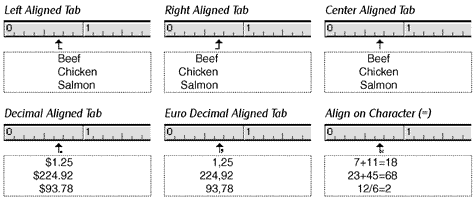
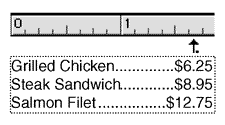
PageStream can also fill the space between the tab stop and the character before it. This is referred to as a dot leader or filled tab, and is commonly used for menus and tables of contents. This is the easiest way to align rows of dots.
To set a tab stop: Choose Tabs from the Type menu to display the Tabs dialog box. Click on the ruler itself to add a tab stop. Select the alignment for the new tab from the Type pop-up menu. Enter the fill character, if desired.
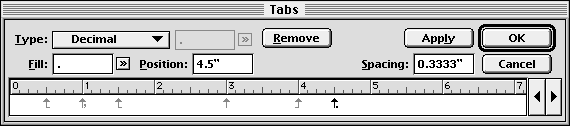
To change a tab stop: Select an existing tab stop by clicking directly on it in the area below the ruler. When the tab is selected, its marker will be black instead of grey. Set the Type, Fill and Position values as desired. Special characters can be easily entered for fill and align on character by clicking the respective Browse buttons. You can also drag a selected tab stop to a new position or delete it by clicking Remove.
![]() The Browse Button
The Browse Button
If there are no tab stops to the right of the insertion point when you press the Tab key, PageStream will indent the text to the next default tab stop. If you set a tab stop, the default tab stops to its left will be ignored so that your text will be correctly tabbed to it, but the default tab stops to its right will remain. The default tab spacing of 0.333" can be changed with the Tabs dialog box.
To insert a right indent tab: Right indent tabs align text following the tab to the right margin. They are not set with the Tabs dialog box. Hold down Shift while pressing the Tab key to insert a right indent tab.
Indents move paragraphs inward from the left and right edges of a text column. You can indent the left and/or right edges of an entire paragraph and indent the first line in the paragraph.
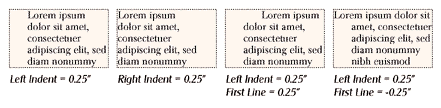
To set indents: Choose Paragraph Format from the Type menu to display the Paragraph Format dialog box, or use the Paragraph view of the Edit palette. Enter the first, left and right indents.
![]()
![]()
To increase or decrease the left indent: Click the Increase
Indent button in the toolbar to increase the left indent to the
next tab stop, or click Decrease Indent to decrease the left indent
to the previous tab stop.
![]()
To create a hanging indent: Click the Hanging Indent button
in the toolbar to increase the left indent to the next tab stop.
The first line indent will be set to the difference between the
next tab stop and the one before it. Use the Hanging Indent button
in conjunction with the Increase Indent button to nest hanging
indents.
To indent text to the insertion point: Press Ctrl / to left indent text following the insertion point to the insertion point's position. This creates a hanging indent that will change if you add or remove text before the Indent Here control.
You can change the amount of space above and below paragraphs. Instead of pressing Return a second time after ending a paragraph to insert a blank line, you can specify the exact amount of space you want before and after paragraphs.
If you choose to add space before paragraphs, PageStream will add the space before all paragraphs except the first paragraph in a text frame or column. If you choose to add space before and after paragraphs, PageStream will combine the values to set the total space between paragraphs.
To set paragraph spacing: Choose Paragraph Format from the Type menu to display the Paragraph Format dialog box, or use the Paragraph view of the Edit palette. Choose Relative from the Before or After pop-up menus to express spacing as a percentage of the paragraph's first line's type size. Choose Fixed to express spacing as a fixed amount. Enter the spacing value into the text boxes.
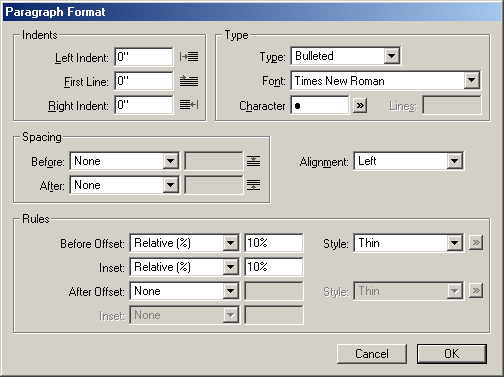
You can change the paragraph type to bulleted to have PageStream automatically insert a bullet at the beginning of a paragraph, you can change the paragraph type to be incrementally numbered, and you can change the paragraph type to drop cap to have PageStream automatically insert a drop cap at the beginning of a paragraph.
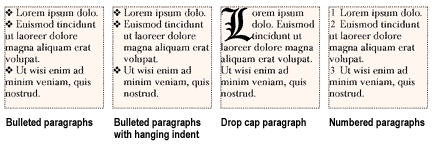
To make a paragraph bulleted: Choose Paragraph Format from the Type menu to display the Paragraph Format dialog box. Select Bulleted from the Type pop-up menu. Choose a font from the Font pop-up menu and enter a character into the Character text box. Special characters can be easily entered by clicking on the Browse button. Click OK.
![]() The Browse Button
The Browse Button
To set a drop cap for a paragraph: Choose Paragraph Format from the Type menu to display the Paragraph Format dialog box. Select Drop Cap from the Type pop-up menu. Choose a font from the Font pop-up menu, enter the number of characters to be made into the drop cap (normally a drop cap is a single character) and the number of lines tall it should be. Click OK. PageStream will flow the text around the new drop cap.
To make a numbered paragraph: Choose Paragraph Format from the Type menu to display the Paragraph Format dialog box. Select Numbered from the Type pop-up menu. Choose a font from the Font pop-up menu. Click OK.
To make a hanging indent with a bullet: At this time, this can only be done manually because PageStream's bulleted paragraph feature does not allow you to set a hanging indent. However, hanging indents with a bullet are easy to create. The amount of indent to use depends on the size of the bullet character. Set the Left indent and the first tab stop to be same positive value, and the Right indent to the negative of the Left indent. You can also click on the Hanging Indent toolbar button to quickly set up a hanging indent of the default tab spacing.
To make a hanging indent with a number: Like bulleted paragraphs, numbered paragraphs do not have the ability to hang automatically. One method to do this manually is to insert the Indent Here command at the start of each numbered paragraph.
![]() The Hanging Indent Toolbar
Button
The Hanging Indent Toolbar
Button
You can set paragraph rules to have PageStream automatically insert a horizontal rule above and/or below a paragraph, and you can change the paragraph rules distance from the beginning or end of the paragraph, rule width and style.
1. Open the Paragraph Format dialog box.
Choose Paragraph Format from the Type menu to display the Paragraph Format dialog box.
2. Select the rule offset method.
For a rule above the paragraph, choose the offset method from the Before Offset menu. For a rule below the paragraph, choose the offset method from the After Offset menu.
Choose None to not display the rule.
Choose Relative to offset the rule by a percentage of the first (or last) line's leading as entered in the text box to the right.
Choose Fixed to offset the rule by a fixed amount as entered in the text box to the right.3. Select the rule inset method.
For a rule above the paragraph, choose the inset method from the Inset menu directly below the Before Offset. For a rule below the paragraph, choose the inset method from the Inset menu directly below the After Offset.
Choose None to set the width of the rule to the full potential width of the paragraph.
Choose Relative to inset the rule by a percentage of the full potential width of the paragraph in the text box to the right.
Choose Fixed to inset the rule by a fixed amount as entered in the text box to the right.The inset amount will indent the rule from the left and right margins.
4. Select the rule style.
For a rule above the paragraph, choose the rule style from the Inset menu directly below the Before Offset. For a rule below the paragraph, choose the inset method from the Inset menu directly below the After Offset.
Choose Thin for a 1 pt black line.
Choose Thick for a 4 pt black line.
Choose Custom and select the browse button to the right to choose a custom line style from the Line Fill dialog box.5. Click OK.
You can align a paragraph so that the left margin is straight and the right margin is ragged or vice versa. You can also center a paragraph so that both margins are ragged and the text is centered in the column, or justify a paragraph so that both margins are straight.
When a paragraph is justified, word and character spacing are changed so that the text is set evenly from left to right. The last line of a justified paragraph will always be aligned with the left margin, unless you set Last Line Flush Zone in the Tracking menu to a greater value than the space between the right margin and the end of the last line. In that case, the paragraph will be force justified.
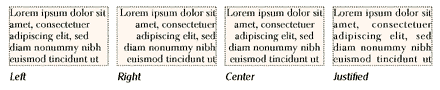
To set alignment: Choose Left, Right, Centered or Justified from the Alignment submenu in the Type menu, or select the alignment from the Alignment pop-up menu in the Paragraph Format dialog box.
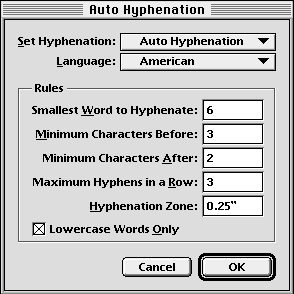
Automatic hyphenation divides words between syllables at the end of a line to avoid short lines. When a word does not fit on a line and automatic hyphenation is selected, a combination of hyphenation algorithms, rules and exceptions will be used to determine whether the word should be hyphenated.
The hyphenation algorithms vary between languages. You can set the hyphenation rules, including the minimum word length to hyphenate, and add exceptions to the hyphenation algorithms to the dictionary.
To automatically hyphenate text: Select Auto Hyphenation from the Hyphenation submenu in the Type menu.
To modify the hyphenation rules: Choose Set Hyphenation from the Hyphenation submenu in the Type menu to display the Auto Hyphenation dialog box. Set the smallest word to hyphenate, the minimum characters before and after a hyphen, the maximum lines which can be hyphenated in a row and the hyphenation zone. You can also limit hyphenation to lowercase words only.
To hyphenate one occurrence of a word: Place the insertion point between the letters at which to break the word. Type Control - (hyphen key) or choose Insert Soft Hyphen from the Hyphenation submenu in the Type menu.
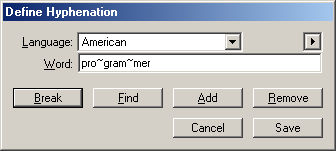
To change hyphenation for every occurrence of a word: Choose Hyphenation from the Define submenu of the Edit menu to display the Edit Hyphenation dialog box. Enter the word to hyphenate into the text box. Click Find to see if the word is already in the hyphenation exceptions file, or click Break to test the hyphenation algorithms. Hyphenation break points are shown by tildes (~). Enter one tilde at each desired break point. Click Add to add the word to the hyphenation dictionary. Click Done to close the dialog box.
To add a list of words to the hyphenation exception dictionary:You can add an ASCII list of words to the hyphenation exception dictionary instead of adding a single word at a time. Choose Hyphenation from the Define submenu of the Edit menu, select the Language from the pop-up menu, then choose Batch Add from the mini-menu in the upper right hand corner of the dialog box. A file selector will appear for you to choose the file to add. The file should be in ASCII form with characters in the native character set as set in the Type Preferences; tildes (~) at each break point; and a tab, paragraph mark or new line character between each of the words. These words will all be added to the user dictionary, but only if the rule based hyphenation for that language will break the word differently.
To export a list of words from the hyphenation exception dictionary:You can export an ASCII list of the hyphenation exceptions to a text file. Choose Hyphenation from the Define submenu of the Edit menu, select the Language from the pop-up menu, then choose Export from the mini-menu in the upper right hand corner of the dialog box. A file selector will appear for you to choose the file to save as. The file will be in ASCII form with characters in the native character set as set in the Type Preferences; tildes (~) at each break point; and a tab, paragraph mark or new line character between each of the words. The main dictionary will come first, with the user dictionary following it in the file.
|
|